Posts

Showing posts from August, 2023

Dragon Lady

Image
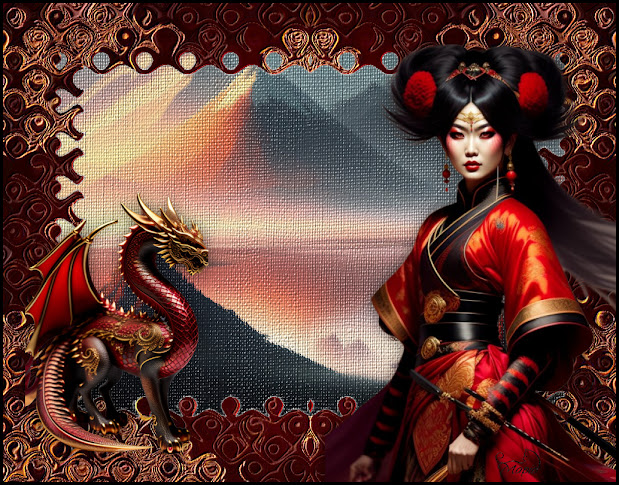
  Translated into French by Manou Merci, Manou Material HERE Outside Plugins Used VM Distortion-Smallpox Alienskin-Splat Demo-Resurface Open your material 1. New Image 1024x750 Select All 2. Open the background-Copy Back to Image-Paste into Selection Select None 3. With the Selection Tool-Rectangle-Feather Nil Cut out the middle Select None 4. Effects-Vm Distortion-Small Pox 5. Effects-Reflection Effects-Rotating Mirror 6. Effects-User Defined Filter-Emboss3 7. With the Magic Wand-Feather 0 Click inside the empty space Include the circles up the top-See Below for settings 8. Layer-New Raster Layer 9. Open the Mount Fuji background-Copy Back to Image-Paste into Selection Select None 10. Effects-Alienskin-Splat Demo-Resurface 11. Go to Raster1-Drop Shadow 12. Back to the Top Layer Merge Down 13. Open the Dragon-Copy Back to Image-Paste as New Layer Resize 75% Move it to the left bottom Drop Shadow-Same as Before 14. Open the Lady Warrior-Copy Back to Image-Paste as New Layer Resize 120%

Butterfly

Image
  Translated into French by Manou Merci, Manou Translated into Dutch by Karin Dank je, Karin Material HERE Thank you Paula Hagan for the beautiful lady and the frame! Outside Plugins Used Toadies-What Are You Murameister-Copies Alienskin-Splat Demo-Resurface Open the Material 1. New Image 1024x750 Select All 2. Open the Slipper Background-Copy Back to Image-Paste into Selection Select None 3. Adjust-Blur-Caussian Blur 4. Open the glitter shoe-Copy Back to Image-Paste as New Layer Resize 140%-all layers unchecked 5. Effects-Image Effects-Seamless Tiling 6. Effects-Image Effects-Seamless Tiling 7. Back to Raster 1 With the Selection Tool-Feather Nil Make a rectangle on the left Promote Selection to Layer Select None Arrange this layer to the top 8. Effects-Texture Effects-Mosaic Antique 9. Effects-Toadies-What Are You 10. Open the little butterfly-Copy Back to Image-Paste as New Layer 11. Place it on the top of the promoted layer Effects-Murameister-Copies Delete any cut butterfly from t

Empress

Image
Translated into French by Manou Merci, Manou Translated into Dutch by Karin Dank je, Karin Material HERE No outside Plugins Used This tutorial idea is from a tutorial by Lin Youngblood There are some neat tricks in there,  that one might have forgotten or didn't know I have her permission to use it here Unzip and open the background and the lady 1. New Image 1024x800 Select All 2. Open the background-Copy Back to Image-Paste into Selection Select None Duplicate Close the bottom layer for now 3. Selection Tool-Feather Nil Cutout a rectangle on the left 4. Promote Selection to Layer 5. Selections-Edit Selection The rectangle becomes red Keep Selected 5. Image-Mirror-Horizontal Mirror Keep Selected 6. Back to the background Layer-Duplicated one Promote Selection to Layer Select None Back to the top-Merge Down 7. Set this Layer to -Dissolve 8. Effects-Texture Effects-Mosaic Glass 9. Go the Layer below New Raster Layer Back to Top-Merge Down Now the Dissolve Layer is back to a normal la

Spanish Rose

Image
  Tranlated into French by Manou Merci, Manou Translated into Dutch by Karin Dank je, Karin Material HERE Outside Plugins Used Filter FactoryE-Gradient Spokes Ratio Maker Alienskin-Impact-Perspective Shadow Open the material Put the Gradients into your Gradient Folder 1. New Image 1024x750 Fill with the Red Gradient 2. New Raster Layer-Select All Open the Lady Tube-Copy Back to Image-Paste into Selection Select None 3. Effects-Image Effects-Seamless Tiling 4. Effects-Reflection Effects-Rotating Mirror Merge Down 5. Effects-Filter FactoryE-Gradient Spokes 6. With the Selection Tool-Feather 1 Select the bottom half-see preview-press Delete Select None 7. Selection Tool-Feather1 Select the bottom half of the top half-see preview 8. Effects-3D Effects-Inner Bevel Select None 9. Duplicate Set this layer to 'Multiply' and Opacity to 50 Merge Down 10. Drop Shadow 11. Back to Raster 1 Effects-Texture Effects-Blinds 12. Open the Lady Tube-Copy Back to Image-Top Layer Paste as New Layer

China Doll

Image
Translated into French by Manou Merci, Manou  Translated into Dutch by Karin Dank je, Karin Material HERE Outside Plugins Used Filter Factory G-Panel Stripes Unzip your material Put the Blanche Renee Script into your Scripts Restricted Folder Put the Gradient into your Gradient Folder Thanks Lin Youngblood for the lovely China doll tube and mask! 1. New Image 1024x750 Fill with the gradient 2. New Raster Layer-Select All Open your China doll tube-Copy Back to Image-Paste into Selection Select None 3. Effects-Image Effects-Seamless Tiling-Default Merge Down 4. Adjuste-Blur-Caussian Blur 5. Duplicate Effects-FilterFactoryG-Panel Stripes-Default 6. Press the K key and pull it down below halfway Also pull it out a bit on either side Press M 7. Effects-Geometric Effects-Spherize Repeat 8. Effects-Reflection Effects-Rotating Mirror 9. Magic Wand-Feather 80 Click inside the empty space and press Delete 3 or 4 times Select None 10. Effects-Texture Effects-Tiles 11. Back to Raster 1 New Raster