Posts

Showing posts from December, 2023

My World

Image
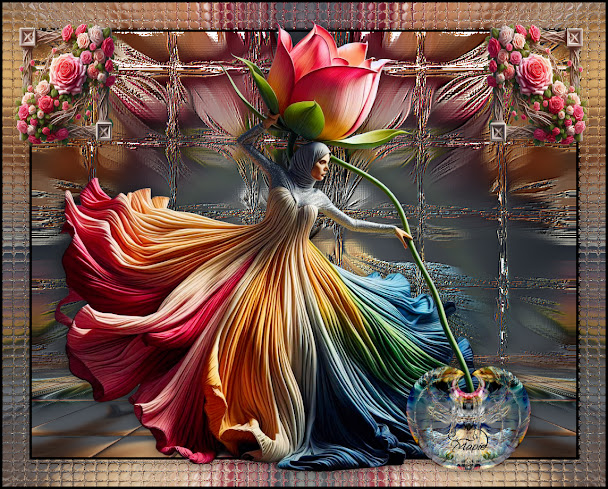
  Translated into Dutch by Karin Dank je, Karin! Translated into French by Manou Merci, Manou Translated into Spanish by SvC-Design, Gracias, Sylviane Material HERE For the ones, who doesn't have the texture for Displacement Map Here it is: HERE All Images AI generated by me Feel free to use them No © needed! Of course no selling :-D Outside Plugins Used Background Designers-Square Bumps Here  is a site where you can get some filters Please note: I have put a lot of filters in Filters Unlimited Like VM, Filter Factory, Background Designers, Simple etc. So, if you don't have them in there, your result might be different All Images AI created by me Open your material 1. New Image 1024x750 Select All 2. Open the background-Copy Back to Image-Paste into Selection Select None 3. Effects-Background Designers-Square Bumps 4. Effects-Distortion Effects-Displacement Map 5. Effects-Distortion Effects-Warp 6. New Raster Layer Fill with #85eee5 7. Layers-New Mask Layer-From Image Merge Gro

Pink Martini

Image
  Material HERE All Images AI generated by me Feel free to use them No © needed! Of course no selling :-D Outside Plugins Used Alienskin-Snapart-Comics Here  is a site where you can get some filters Please note: I have put a lot of filters in Filters Unlimited Like VM, Filter Factory, Background Designers, Simple etc. So, if you don't have them in there, your result might be different Open your material 1. New Image 1024x750 Select All 2. Open the background-Copy Back to Image-Paste into Selection Select None 3. Effects-Alienskin Snapart-Comics-Default 4. New Raster Layer Fill with White Layers-New Mask Layer-From Image Merge Group Set this Layer to 'Overlay'-Opacity 75 5. Effects-User Defined Filter 6. Image-Add Borders 5 Black Image-Add Borders 50 White 7. Open the Text Deco-Copy Back to Image-Paste as New Layer Don't move it 8. Open the Pink Lady-Copy Back to Image-Paste as New Layer Resize 75% Place her to the left as shown 9. Merge Visible Add your Watermark and sa

Naiads

Image
  Material HERE All Images AI generated by me Feel free to use them No © needed! Of course no selling :-D Outside Plugins Used VM Distortion-Radiator Toadies-What Are You Here  is a site where you can get some filters Please note: I have put a lot of filters in Filters Unlimited Like VM, Filter Factory, Background Designers, Simple, Toadies etc. So, if you don't have them in there, your result might be different Open your material Put the Blanche Renee Script in your Scripts-Restricted Folder 1. New Image 1024x750 Select All 2. Open the background-Copy Back to Image-Paste into Selection 3. Effects-VM Distortion-Radiator 4. Effects-Reflection Effects-Rotating Mirror 5. Effects-Toadies-What Are You 6. New Raster Layer-Fill with White Layers-New Mask Layer-From Image Merge Group Set this layer to 'Lumninance'-Opacity 50 7. Effects-Edge Effects-Enhance More 8. Open the Misted Background-Copy Back to Image-Paste as New Layer Resize 50% Move it up a bit  9. Open the beautiful elf

On Golden Pond

Image
  Translated into French by Manou Merci, Manou Translated into Dutch by Karin Dank je, Karin Material HERE All Images AI generated by me Feel free to use them No © needed! Of course no selling :-D Outside Plugins Used AAA Texture Frame Here  is a site where you can get some filters Please note: I have put a lot of filters in Filters Unlimited Like VM, Filter Factory, Background Designers, Simple, Toadies etc. So, if you don't have them in there, your result might be different All Images AI created by me Except the Mask Put the Gradient into your Gradient Folder Open your Material Set your Foreground to Gradient 1. New Image 1024x750 Select All 2. Open the background-Copy Back to Image-Paste into Selection Select None 3. Effects-Reflection Effects-Rotating Mirror 4. New Raster Layer Fill with the Gradient 5. Layers-New Mask Layer-From Image Merge Group 6. Duplicate Merge Down Set this layer to 'Hard Light' 7. Open the Earth Lily-Copy Back to Image-Paste as New Layer Resize 7

My Flower

Image
 Material HERE All Images AI generated by me Feel free to use them No © needed! Of course no selling :-D Outside Plugins Used Vanderlee-Unplugged-Tan Deform Murameister-Perspective Tiling Flaming Pear-Flexify 2 Open your material 1. New Image 1024x800 Select All 2. Open the background-Copy Back to Image-Paste into Selection Select None 3. Effects-Image Effects-Seamless Tiling 4. Effects-Reflection Effects-Rotating Mirror 5. Adjust-Blur-Radial Blur 6. Effects-Vanderlee-UnpluggedX-Tan Deform 7. Duplicate Effects-Murameister-Perspective Tiling 8. Magic Wand-Feather 80 Click inside the empty space Press Delete 2 or 3 times Select None 9. Back to Raster 1 Effects-Distortion Effects-Displacement Map 10. Effects-User Defined-Emboss 3 11. Duplicate Effects-Flaming Pear-Flexify2 12. Arrange to Top Resize 50% once and then 75% Edit-Copy Paste as New Image 13. Back to Main Image Delete the vase image 14. Back to Raster 1 (bottom image) Edit-Copy 15. Image-Add Borders 5-Black Image-Add Borders 50-

Angel Baby

Image
Translated into French by Manou Merci, Manou Translated into Dutch by Karin Dank je, Karin Material HERE All Images AI generated by me Feel free to use them No © needed! Of course no selling :-D Outside Plugins Used Alienskin5-Texture-Weave Murameister-Perspective Tiling AAA Fotoframe Images AI created by me Open your material Put the Gradient in your Gradient Folder 1. New Image 1024x750 Select All 2. Open the Background-Copy Back to Image-Paste into Selection Select None 3. Adjust-Blur-Radial Blure 4. Effects-Alienskin-Textures-Weave 5. Effects-Reflection Effects-Rotating Mirror 6. Duplicate Effects-Murameister-Perspective Tiling 7. With Magic Wand-Feather 80 Click inside the empty space Press Delete 5 times Select None 8. Open the Window-Copy Back to Image-Paste as New Layer Use the K key on the keyboard and push it up and out a bit Press the M key on the keyboard 9. Open the Merry Christmas sign-Copy Back to Image-Paste as New Layer Duplicate Set this Layer to Hard Light Merge Down