Leisure Walk
Translated into French by Manou
Merci, Manou
Material HERE
All Images AI created and tubed by me
Except the lovely Fairy
She was tubed by Lin Youngblood
Feel free to use them
No © needed
But please don't sell them as your own
Outside Plugins Used
Redfield LatticeXP
(If you don't have LatticeXP,
I've included the background created by XP in the zip)
A Plugin Site HERE
For Everything PSP
including Tubes, Masks, Tutorials etc
You will need to register, but it's free!
Put the Gradient into your Gradient Folder
Open your material
Set your Foreground to Gradient
1. New Image 1024x750
Fill with the Gradient
2. New Raster Layer
Select All
Open the Fairy-Remove Watermark-Copy
Back to Image-Paste into Selection
Select None
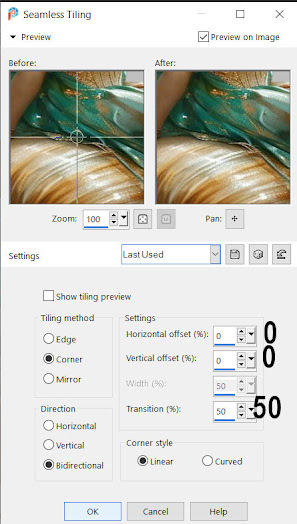
4. Effects-Image Effects-Seamless Tiling-Side by Side
5. Repeat Seamless Tiling but this time Default
Merge Down
6. Effects-Reflection Effects-Rotating Mirror
7. Duplicate
Effects-Distortion-Displacement Map
Merge Down
8. Duplicate
Effects-Redfield-Lattice XP-Jolly Plaques-Default
9. Press the K on the keyboard and pull it down a little below halfway
Press the M on the keyboard
10. Magic Wand-Feather 90
Click inside the empty space
Press Delete three times
Merge Down
11. Duplicate
Put this Layer in 'Multiply' , Opacity 50
Merge Down
12. Open the Misted Background-Copy
Back to Image-Paste as New Layer
Resize 50%
Place it top middle
13. Open the Fairy-Copy
Back to Image-Paste as New Layer
Resize 55%
Place her to the Left
14. Drop Shadow
15. Go back to Raster1-Copy
16. Set your Foreground to #43260e
Image-Add Borders 5-Foreground
Image -Add Borders 60-White
17. Magic Wand-Feather Nil
Click inside the White Border
Paste into Selection
18. Adjust-Blur-Caussian Blur
Keep Selected
19. Selections-Modify-Contract
20. Effects-3D Effects-Inner Bevel
22. Open the Butterfly-Copy
Back to Image-Paste as New Layer
Resize 85%
Place it bottom right
Merged Visible
Add your Watermark and save as .JPG


This comment has been removed by the author.
ReplyDeleteköszönöm a szép leckét.
DeleteSo glad you enjoyed it! xx
DeleteThe material of another lesson !!!
ReplyDeleteSo sorry about that! I will fix it now! Thank you for letting me know!
DeleteHi Mapie.
ReplyDeleteThe link for the material is for the previous tutorial, The Fortune Teller. xoxoxo...Sue
Sorry Sue! I will fix it now! Thanks for letting me know!
ReplyDeleteThanks Mapie. Completed and fun. I love using different effects. And I appreciate the large, dark lettering. xoxoxo...Sue
ReplyDeleteGlad you enjoyed it, Sue! xxx
Delete